How to Make Spring Easter Cakesicles


Spring Easter Cakesicles is the new Cake pop. Make these spring Easter cakesicles for your next gathering. Learn how to make this dessert with our step-by-step instructions. So fun to make and you can use whatever flavor cake you want and decorate the cakesicles how you like. These make great Easter treats or for a fun Spring gathering.
Jump to Recipe
What Are Cakesicles?
Cakesicles are mini cakes on a stick coated in some type of dipping chocolate and then decorated as you like. The cake inside is a mixture of cake and frosting, creating a delicious, moist interior to your cakesicle.
How To Make Cakesicles?
Bake the Cake
The first step in making delicious cakesicles is to bake your cake. I typically will bake my cake the night before I want to make my cakesicles. This time I wanted the cake filling to be a funfetti cake. Here are the ingredients I used:
- funfetti cake mix
- eggs
- white or milk
- sour cream
- instant vanilla pudding
I like to use some of the ingredients listed on my cake mix box, but I swap some too. I used a white cake with confetti mix. The back of my cake mix gave options of using just egg whites or whole eggs. I used whole eggs, the amount listed on my box which for mine was 3.
Then it lists water. You can use water or milk. Use the amount directed on the box. DO NOT use oil. I’ve found that the oil will make the cake inside a little oily. The cake will be getting frosting added to it, so it will be moist, I promise!
Then I add 3 tablespoons of instant vanilla pudding mix and 3 tablespoons of sour cream. Mix it all together and then bake at 350 degrees in a 9×13 pan. Let it cool completely before moving on.

Once the cake has cooled, add it to your mixer. If you don’t have a mix you can do this by hand. Use the paddle attachment and mix up the chunks of cake until crumbly.

Then add half a tub of store-bought frosting. For these cakesicles I used a cream cheese frosting.

Mix the frosting and cake crumbs together on a low speed until combined. When you grab a handful and squeeze it should form a ball.
Melt The Chocolate
Affiliate links are provided for your convenience.
Here are the items I used to make the cakesicles
- Cakesicle Mold (comes with 8 openings)
- vanilla melts
- spring sprinkles
- frosting tubes

This is the cakesicle mold that I used: CAKESICLE MOLD and it works great for me. I wanted the look of white chocolate and used vanilla melts. In a bowl, I melted the vanilla melts as directed on the package. I started with 30 seconds in the microwave in a heat safe bowl, stir, and then added more time until it was almost completely melted. Then I stirred it until it was completely melted. Then I let it sit for about 30 seconds before painting the melted chocolate into the mold.

Make sure to coat the bottom and sides of the mold well. Then you want to insert the popsicle stick so that the chocolate doesn’t close that opening. I put the popsicle stick in the mold and then remove it. Place the mold into the fridge while you paint in the second set of mold. If you don’t have a paintbrush you can use the back of a small spoon.
Add the Cake Crumble

I let the cakesicle silicon mold sit in the refrigerator or freezer for just a few minutes to let it harden before painting on the second coat of chocolate. Let it sit on the counter for 10 minutes or a couple of minutes in the fridge before putting the cake mixture in. Gently press the cake into the mold leaving a little space on the top for a coat of chocolate. Insert the popsicle sticks into the mold and leave them inserted.

I like to use a spatula to spread the chocolate on the top. You may need to return the chocolate melt to the microwave for a few seconds to remelt it. Spread a layer of the chocolate on top of the cake filling, making sure it goes to the edges.

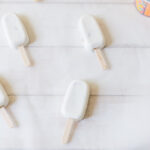
I return the molds to the freezer for 15-30 minutes before I pop the cakesicles out. Aren’t the cute??? You can use a pairing knife to clean up the edges of the white chocolate shell before decorating.
Decorate Your Easter Cakesicles
Now is the fun part! It’s time to decorate. I started with the tubes of frosting and make some zig-zag lines. Then you can add whatever sprinkles you want. Small sprinkles, large sprinkles, little bunnies, mini easter candy, mini jelly beans – the options are endless!
Other Cakesicle Flavor Combos
- carrot cake and cream cheese frosting
- chocolate cake with fudge frosting
- milk chocolate cake with milk chocolate frosting
- dark chocolate cake with dark chocolate frosting
Cakesicles make great gifts and the perfect party favors. You can put them in baggies and gift them. I hope you found this recipe and tutorial helpful and that you make your own soon.
Spring Easter Cakesicles

Equipment
- cakesicle molds
Ingredients
Cake
- 1 box cake mix funfetti
- 3 eggs
- 1 cup water
- 3 tbsp instant vanilla pudding mix
- 3 tbsp sour cream
- ½ tub frosting cream cheese
Cakesicle
- 4 cups white wafer melts
- decorative sprinkles
Instructions
Cake
- Preheat your oven to 350°F. Spray a 9×13 Pan with nonstick spray.
- Combine the funfetti cake mix, water, eggs, instant vanilla pudding mix, and sour cream. Mix until smooth.
- Pour into the sprayed 9×13 pan and bake according the the cake mix box, usually around 35 minutes.
- Let the cake cool completely.
- Put you the cooled cake into a mixer bowl and attach the paddle attachment. Mix on low until the cake has crumbled.

- Add ½ of the tub of frosting to the mixer bowl and mix on low until combined.


Making Cakesicles
- Melt your melting vanilla wafers in a microwave safe bowl according to directions. I usually start with 30 second intervals, stir and repeat until melted.
- Let the melted chocolate sit for about 20 seconds before painting the melted chocolate into the mold. Make sure you coat the bottom and sides well.
- You need to insert the popsicle stick into the slot on the bottom so that the opening won't be sealed with the melted chocolate. You can insert the stick and then remove the popsicle sticks.
- Place the mold into the freezer for about 5 minutes to let that coat dry.
- Remove from freezer and do a second coat of the melted chocolate, repeat the steps from above.
- Remove from the freezer again and take a small ball size of the cake mixture and press it into the mold. You want the cake to almost go all the way to the top.
- Now insert the popsicle back into the mold and press it all the way in.
- Time for the melted chocolate on the top. You may need to reheat the chocolate to get it melted again. I like to use a offset spatula to spread a layer of chocolate on top.
- Once you've coated the top of the molds, place back into the freezer for 15-30 minutes to let it set up.
- After it's setup, you can remove the molds and press the cakesicles out. If needed you can use a pairing knife to clean up the sides.


Decorating Cakesicles
- Now decorate your cakesicles how you'd like with frosting and sprinkles.